5 Tips to improve your outdoor photography on your smartphone

Pierre Mangez: guide, entrepreneur, photographer. Pierre is co-owner of The Green Trails and Stockholm Outdoor. On the side he is a freelance sports- and outdoors photographer. Meet Pierre in the archipelago during summer or on the ice in the winter, when he guides our outdoor trips!
![]()
People often ask me for tips to improve their outdoor photography for their smartphone photos. We’re in 2017, and mobile phone cameras are getting better and better. Apple has just released their iPhone X. But don’t count on the smartest of the smartphones to shoot great pictures by itself, especially in a tough environment like when ice skating or snow shoeing! To help you shoot amazing photos this winter season, I have collected my 5 best tips to improve your outdoor photography on your smartphone.
“The best camera is the one that is with you”

I once heard “the best camera is the one that is with you”. This sentence makes a lot of sense when you’re outdoors. In most cases it’s our smartphone that we have in our pockets. Smartphones are nowadays equipped with capable cameras, many of them are waterproof, they are quite light and we basically always have them on us.
1 Clean the lens of your phone:
Our phones take a lot of abuse and handling, which results in fingerprints covering the outside of the lens.With a piece of cloth (shirt, fleece, anything that is dry and soft), quickly clean the lens on the back of your smartphone before you take a photo. That will avoid blurry/shiny pictures.
However, sometimes getting some light snow on the lens can create a great effect! Pay attention to the blurry spots under the sun
2 Hold your camera tight:
Remember to hold your smartphone tightly with both hands specially if it’s a grey day without much light. Most of the phones can actually take the shot by pressing the volume up or down button on the side of the phone. This really helps to get sharp images without removing your gloves.
3 The rule of 1/3
The ultimate rule in photography is the rule of thirds. It basically means that you place your subject in a third of the image. Some phones have the option to activate so called ‘grid lines’, which will divide the frame in 9 zones. This helps you to place the subject of your photo to take up roughly one third of the image.
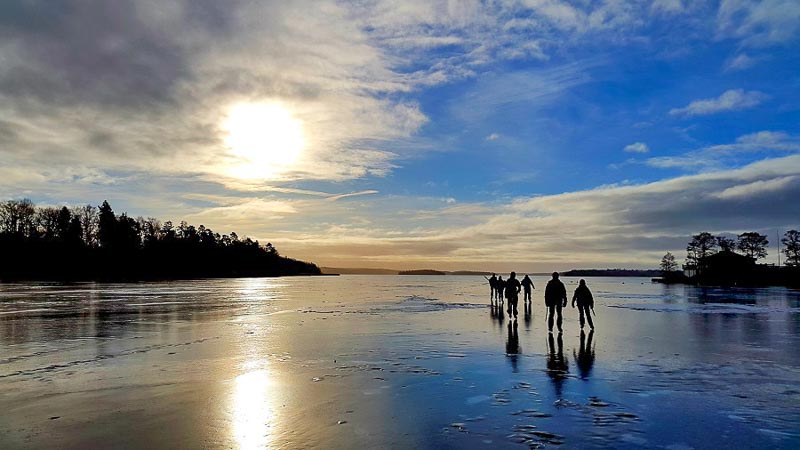
Note that the ice skates on this photo are located on the right 1/3 and the lower 1/3 of the photo. The sun and the horizon are also placed roughly according to the 1/3 principal.
4 Think about your composition
That being said, sometimes placing the subject in the center of the image isn’t wrong, especially on square images which are popular on Instagram. Take one of last year’s ice skating trips I was guiding as an example, or a similar situation. The ice had formed a very nice pattern, and the sky was a flat grey. I placed the horizon line on the upper part of the frame so that more ice was covered in the foreground. Next, simply place a group of ice skaters somewhere on the left or right of the image and you get a great shot.

In this photo I lifted my phone up as high as I could
A few ideas to play with: bring people into the frame, it gives the viewers something to relate to and scale the photo. Insert something in the foreground, it can be backpack, a crack in the ice… Play with reflections like in a pool of water. Change your point of view, lay low or lift your phone up high, that way you incorporate more or less ice in the picture. Be creative!
5 Edit, edit, edit!
There must be hundreds of free applications to edit your pictures. Instagram is the easiest one thanks to its ready-to-use filters. Before you start applying any filters to your photo, make sure your screen’s brightness is set at 100% and that any orange filter app is turned off. Once you’re ready to start editing the image, don’t be afraid to experiment! Try cropping the image, add some punch by tapping on the sun on the upper part of the screen, apply one of the many available filters and that’s it, you are done. You can also edit the image manually and tune the exposition, lift the shadows, or darken the highlights. Once shared with Instagram, it’s saved in a separate picture folder on your phone and can be shared further by email, Facebook…
“Have loads of fun!”
I hope these 5 tips will help you to improve your outdoor photography while using your smartphone. But don’t forget the most important part of making photos: be creative, experiment and have loads of fun!
/PIERRE
![]()